

How to Add a Rainbow to a Photo: Creative Tips for Beautiful Results
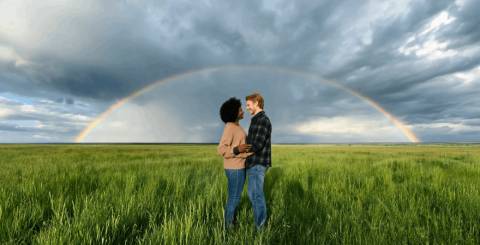
Photography helps us capture memories, express emotions, and tell stories through images. Sometimes, a photograph needs a creative touch to achieve the desired look. Adding a rainbow can transform an ordinary landscape into a colorful scene or give a portrait a dreamy atmosphere. With modern photo editing tools, learning how to add a rainbow to a photo is easier than ever, even for beginners. Whether you want to enhance a landscape, create eye-catching social media content, or experiment with digital art, a rainbow can make your images more engaging. The secret is choosing the right editing method and ensuring the effect complements the original photograph.
Why Add a Rainbow to a Photograph?
Rainbows symbolize hope, beauty, positivity, and new beginnings. Their vibrant colors can create an emotional connection with viewers, making them useful in personal photography, digital art, travel content, and promotional graphics. A landscape featuring mountains, trees, or open fields can become more memorable with a carefully positioned rainbow. Similarly, adding one to a cloudy sky can introduce contrast and visual interest. Here are some popular reasons to add rainbow effects to photographs:
- Enhance landscapes: Add color to photographs of mountains, beaches, forests, and countryside views.
- Improve social media content: Create colorful images that attract attention on Instagram, Pinterest, and other platforms.
- Create digital artwork: Develop imaginative backgrounds, fantasy scenes, and dreamlike compositions.
- Personalize portraits: Give portraits a playful, expressive, or nostalgic appearance.
- Design promotional graphics: Incorporate rainbow imagery into event announcements, invitations, and creative campaigns.
For the best results, make sure the rainbow supports the main subject instead of distracting from it.
Read more: 6 Basic Image Editing Tips to Transform Your Photos
What Makes a Rainbow Look Realistic?
Understanding how natural rainbows form can help you create more convincing edits. Rainbows appear when sunlight interacts with water droplets in the atmosphere. Light bends as it enters a droplet, reflects internally, and separates into different colors as it exits. A realistic rainbow effect requires more than adding bright colors to the sky. Lighting, color intensity, and placement all influence the final result.
Consider Light Direction
Natural rainbows generally appear in the part of the sky opposite the sun. Before adding one, examine the direction of sunlight and the shadows in your photograph. Placing a rainbow in an area that conflicts with the scene's lighting may make the effect look artificial.
Adjust Color Intensity
Natural rainbows vary in brightness. Some are vivid, while others appear faint against cloudy skies. An overly saturated rainbow can make an otherwise realistic photograph look unnatural. Reducing opacity and softening the colors can help the effect blend into the scene.
Match the Atmosphere
Rainbows commonly appear in skies containing moisture, rain, or mist. Cloudy landscapes, waterfalls, and distant mountains can provide suitable backgrounds. You can still add a rainbow to a clear sky for artistic purposes, but the result may look more stylized than realistic.
How to Add a Rainbow to a Photo
You do not need professional photography equipment or advanced design skills to create a rainbow effect. Many online editors and mobile applications offer overlays, gradients, and transparency controls that simplify the process. Follow these steps to achieve a polished result.
Step 1: Choose the Right Photograph
Start with an image that has enough open space for the rainbow. Landscapes are often ideal because the sky provides room for the effect. Look for balanced lighting, interesting clouds, and a clear distinction between the foreground and background. For portraits, choose an image where the rainbow can appear behind the subject without covering important facial features.
Step 2: Select a Rainbow Editing Tool
Choose an editor that offers rainbow overlays, color gradients, resizing, and transparency adjustments. These features allow you to control the effect without requiring complicated editing techniques. If you prefer a straightforward approach, an add rainbow to photo tool can help you explore online editing options and create colorful images with minimal effort. Before uploading your photograph, check whether the tool supports high-resolution exports and provides suitable privacy protections.
Step 3: Position the Rainbow Carefully
Place the rainbow in an open area of the sky or background. Adjust its size to fit the photograph's composition. A full semicircular rainbow may suit a wide landscape, while a partial rainbow can work better in a portrait or close-up image. Avoid covering important details such as buildings, trees, or people. The rainbow should enhance the scene rather than become its only point of interest.
Step 4: Adjust Transparency and Colors
Once the rainbow is positioned, adjust its opacity, saturation, brightness, and contrast. A bright afternoon landscape may suit vibrant colors, while a misty mountain scene may look better with softer shades. Experiment with small adjustments until the rainbow complements the original lighting.
Step 5: Blend the Effect Naturally
Blending helps the rainbow look like part of the photograph. Depending on your editing software, you can use layer masks, feathered edges, or blending modes. Layer masks are especially helpful when you want the rainbow to appear behind trees, buildings, or clouds. They let you hide selected areas without permanently removing parts of the effect.
Step 6: Review and Save Your Image
Compare the edited photograph with the original before exporting it. Check the rainbow's edges, color transitions, and overall balance. Review the image at its intended display size, since an effect that looks subtle on a large screen may appear too strong on a mobile device. JPEG is generally suitable for sharing photographs online, while PNG can be useful for certain graphics and editing workflows.
Creative Ways to Use Rainbow Effects
Rainbow editing works for more than landscape photography. With the right approach, it can support several creative projects.
Travel Photography
A rainbow can introduce an artistic element to photographs of beaches, mountain roads, lakes, and city skylines. For a convincing result, choose an image whose lighting and atmosphere complement the effect. If you digitally add a rainbow to a photograph intended to document a real location or event, disclose the edit when accuracy matters.
Portraits and Social Media
Rainbow effects can create colorful backgrounds for portraits and profile pictures. They also work well in themed social media posts. When editing portraits, preserve natural skin tones unless you intentionally want a more experimental style. Coordinating the rainbow with clothing and background colors can help create a consistent visual appearance.
Digital Art and Promotional Graphics
Digital artists can combine rainbows with illustrated clouds, stars, and imaginative landscapes. In invitations, event announcements, and promotional designs, rainbow colors can create a cheerful atmosphere. Consider text readability when designing graphics. Placing a rainbow directly behind a headline may make the words harder to read, so positioning the effect around the edges can be more effective.
Common Mistakes to Avoid
Even simple editing can produce disappointing results if a few important details are overlooked.
- Excessive saturation: Extremely bright colors may look disconnected from the photograph. Adjust saturation gradually.
- Incorrect placement: A rainbow that conflicts with the lighting can appear pasted onto the image. Consider sunlight direction and shadows.
- Poor sizing: An oversized rainbow can overwhelm the main subject. Choose proportions that suit the composition.
- Unnatural edges: Hard edges can reveal that an overlay was added digitally. Use soft transitions or masking where appropriate.
- Overediting: Combining too many filters, effects, and contrast adjustments can make the image look cluttered. A restrained approach often produces better results.
- Low-quality exports: Saving at a very low resolution can reduce image clarity. Select export settings appropriate for your intended use.
Tips for Better Photo Editing
Keep an untouched copy of the original photograph so you can experiment without losing the source image. Whenever possible, work with separate layers, making it easier to resize, reposition, or remove the rainbow. You can also study photographs of natural rainbows to understand their shape, color intensity, and relationship with clouds. These references help you recognize which effects look realistic and which work better as artistic choices. Think about the purpose of your image before editing. A travel photograph usually benefits from subtle adjustments, while fantasy artwork allows greater creative freedom. Privacy is also important when using online editing services. Review their privacy policies, image storage practices, and deletion options before uploading personal photographs.
The Future of Creative Photo Editing
Online editors, mobile applications, and artificial intelligence tools continue to make photo editing more accessible. Features such as background detection, automatic object removal, and visual effects can simplify tasks that once required advanced software. However, automated tools cannot replace every creative decision. Users still need to consider composition, lighting, color balance, and the overall mood of an image. Understanding these principles will help you produce better results, regardless of which editing application you choose.
Conclusion
Adding a rainbow to a photo is an effective way to introduce color, atmosphere, and personality into an image. Whether you are enhancing a landscape, creating social media content, or experimenting with digital art, the right approach can make an ordinary photograph more engaging. Choose a suitable image, position the rainbow carefully, and adjust its transparency and colors to complement the original scene. Pay attention to blending, preserve important details, and avoid effects that overwhelm the subject. With practice and the right editing tools, you can create rainbow-enhanced photographs that look polished, expressive, and visually appealing.
Similar Articles

Choosing the right lens is one of the most important decisions any photographer can make. While camera bodies often receive the most attention, it is the lens that truly shapes the final image

Commercial photography requires precision, clarity, and professional-level image quality. Whether photographing products, fashion, food, or corporate portraits, the equipment used in the studio plays a crucial role in achieving the desired results

Cameras have long been one of the most revolutionary inventions in human history, transforming the way we capture, preserve, and share memories.

Product photography plays a vital role in attracting customer attention and getting sales. As we enter the year 2025, we must adapt to the rising trends of photography to stay abreast of the world.

Long-term time-lapse cameras have become a game-changer in various industries. With the ability to capture slow processes over extended periods, these cameras offer a unique perspective on changes that would otherwise go unnoticed.
When digital cameras began to become widely available and somewhat affordable, it seemed as if analogue cameras would fall into obscurity in the face of this seemingly superior technology.
For budding photographers, there’s a good amount of info out there. You can find out about apertures, lenses, and exposure times pretty easily
"No one is perfect on this globe; we all make mistakes at some point." This adage also applies to the photography profession, especially to new photographers. Some people are gifted with great photography skills, while some are not.
Not every picture you take might turn out the way you would expect it to. Thankfully there are many photo editing programs that can help you give some finishing touches and add artistic visions to your pictures.