A DIYer's Way to Fix a Brick Driveway
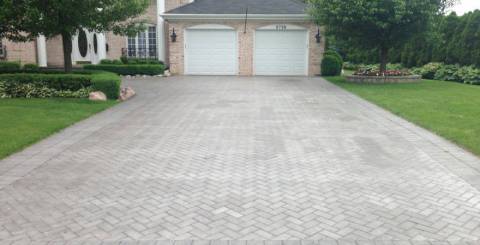
Brick driveways are quite common for American homes, as brick pavers are among the most affordable landscaping materials, which, in addition to that, looks really classy and provides different options when it comes to the size, the color of pavers and the installation pattern. But, as pretty much any kind of driveway surface, brick pavers get damaged after a while due to the high traffic. They may crack and chip, requiring a repair or replacement.
There’s the way to prevent such damage or at least prolong the life of the brick paved surface. In order to do that, masonry contractors recommend sealing brick driveways, patios or walkways immediately after their installation. The sealer will ensure that the bricks on your driveway look as good as new for a long time, as well as protect them from the wear and tear caused by the influence of the weather conditions. As the sealer coat doesn’t last the lifetime, it’s necessary to reapply it every few years to keep the surface, paved with bricks, constantly protected.

Unfortunately, sealer, applied onto the brick pavers, isn’t able to prevent the mechanical damage. In other words, the cracks and chips which appear if, for instance, something is dropped on the brick pavers, are inevitable. Obviously, such damage is quite selective and far from being crucial, as it’s totally possible to pull a few cracked bricks out of a paved driveway and replace them with the new ones.
This simple guideline will help you do conduct a solid repair and secure the new pavers in place without ruining the surrounding pavers.
Steps to fix a damaged brick driveway
Clean the area
The first thing you want to do after collecting the tools and materials listed below is cleaning the driveway, at least around the damaged area to make sure that the mortar sticks to the neighboring pavers and the quality of the installation, as well as the durability of your repair, isn’t undermined by the grime, dust, and debris accumulated on the driveway.
Thus, take a broom and thoroughly sweep the driveway to get rid of the dust and debris. Be quite particular about the mortar seams around the pavers. This is also a good chance to remove the oil stains on your driveway that have been bothering you for a while. Rub them off using the mixture of room temperature water and white vinegar. If there’s some dirt or grime left on the pavers after you swept them, get rid of it using a wet soft-bristled brush.
Once that’s done, wash your brick driveway using a garden hose, so that the water under the strong pressure removes the rest of the dirt and dust and leaves the surface crispy clean.
Make sure that the driveway is completely dry before proceeding to the next steps.

Examine the damage
While your driveway is drying, find the damaged bricks, mark them with chalk not to miss any and inspect them to figure out whether you’re able to repair them or they have to be replaced. Masonry contractors note that even if the brick paver has a few cracks on its surface or its corner is chipped, you might be able just to turn in upside down and reinstall with the ‘pretty’ side facing up. But, you’ll have to extract the pavers to know that for sure.
Remove the damaged brick
Using a hammer and a chisel, break down the mortar around the damaged brick until you’re able to pull it out of its place. Assess the damage and, if the brick appears to be quite crumbly or if the entire paver is covered in a web of cracks, toss it away, as you won’t be able to reuse it. If you may turn the damaged side inwards, save the brick for later.
Don’t forget to remove the mortar crumbles and clean the holes in your driveway left after the brick extraction.
Prepare the mortar and match the replacement brick to the rest of the driveway
Sometimes it’s quite difficult to find the brick pavers, which would match the ones that are installed on your driveway just due to the discoloration that happens to the brick after a long-term exposure to the sun and precipitations.
Thus, if you don’t want your patchwork to be too obvious, you might have to treat the replacement brick to match its color to the rest of the driveway. If the new pavers turn out to be a few shades darker than you need, brush them with milk/yogurt and let them dry to lighten their surface. If they’re too light or don’t look as weathered as the rest of the driveway, make them look so by brushing some dirt or ash into its surface.
When that’s finished, prepare the mortar mix following the instruction on its package.

Install replacement pavers
Grab some mortar mix with a trowel and apply approximately a 3/4-inch layer of it onto the hole the brick will go into. Then, take the replacement brick, spray its sides (apart from the top one) with some water, spread a thin layer of mortar on them and press the brick down in place so that it is level with the surrounding pavers.
Remove the excess mortar around the freshly installed brick, clean the seam to make it crisp and you’re done. Additionally, you may apply a layer of sealer onto the repaired areas to prevent the premature weathering.
Tools and materials required for the project:
- Replacement brick pavers
- Mortar
- Pointing trowel
- Chisel
- Drill
- Hammer
- Paintbrush
- Soft-bristled brush
- Broom
- Bucket
- Garden hose
- Water
- White vinegar
- Sealant for brick pavers
Similar Articles
A well-designed garden has the power to transform not only your outdoor space but also your lifestyle.
Embarking on a landscaping project is an exciting journey, whether you’re revamping your front yard, designing a tranquil retreat, or creating an outdoor entertainment space. However, one crucial decision often presents itself early on: should you take the DIY route or enlist the expertise of a professional landscaper?
Have you ever looked at a tree in your yard and thought, 'Maybe it's time for that to go?' Perhaps it's causing more mess than it's worth, getting too big for its boots, or simply not fitting your vision for your outdoor space.
In today’s world, sustainability is no longer just a trend it's a necessity. As travelers become more eco-conscious, businesses in the tourism and leisure industries, especially resorts and parks, are adopting greener practices to stay relevant and competitive.
Enhance your outdoor space with expert landscaping. Create a beautiful, functional retreat with the right plants, hardscaping, lighting, and design principles.
Discover the unseen value of outdoor benches in enhancing public spaces, fostering community, boosting economy, and promoting sustainability with smart design.
In order to turn outside areas into stunning, practical, and sustainable settings, professional landscaping businesses are essential. Their knowledge extends beyond aesthetics; they can handle anything from hardscape building to plant health.
Discover VersiScape: a groundbreaking solution revolutionizing urban landscaping with green walls, roofs, stormwater management, and sustainable design.
Discover why quality landscaping supplies are essential for a stunning yard. Learn how the right tools, soil, and materials can transform your garden.

